Download PDF
Translations (PDF)
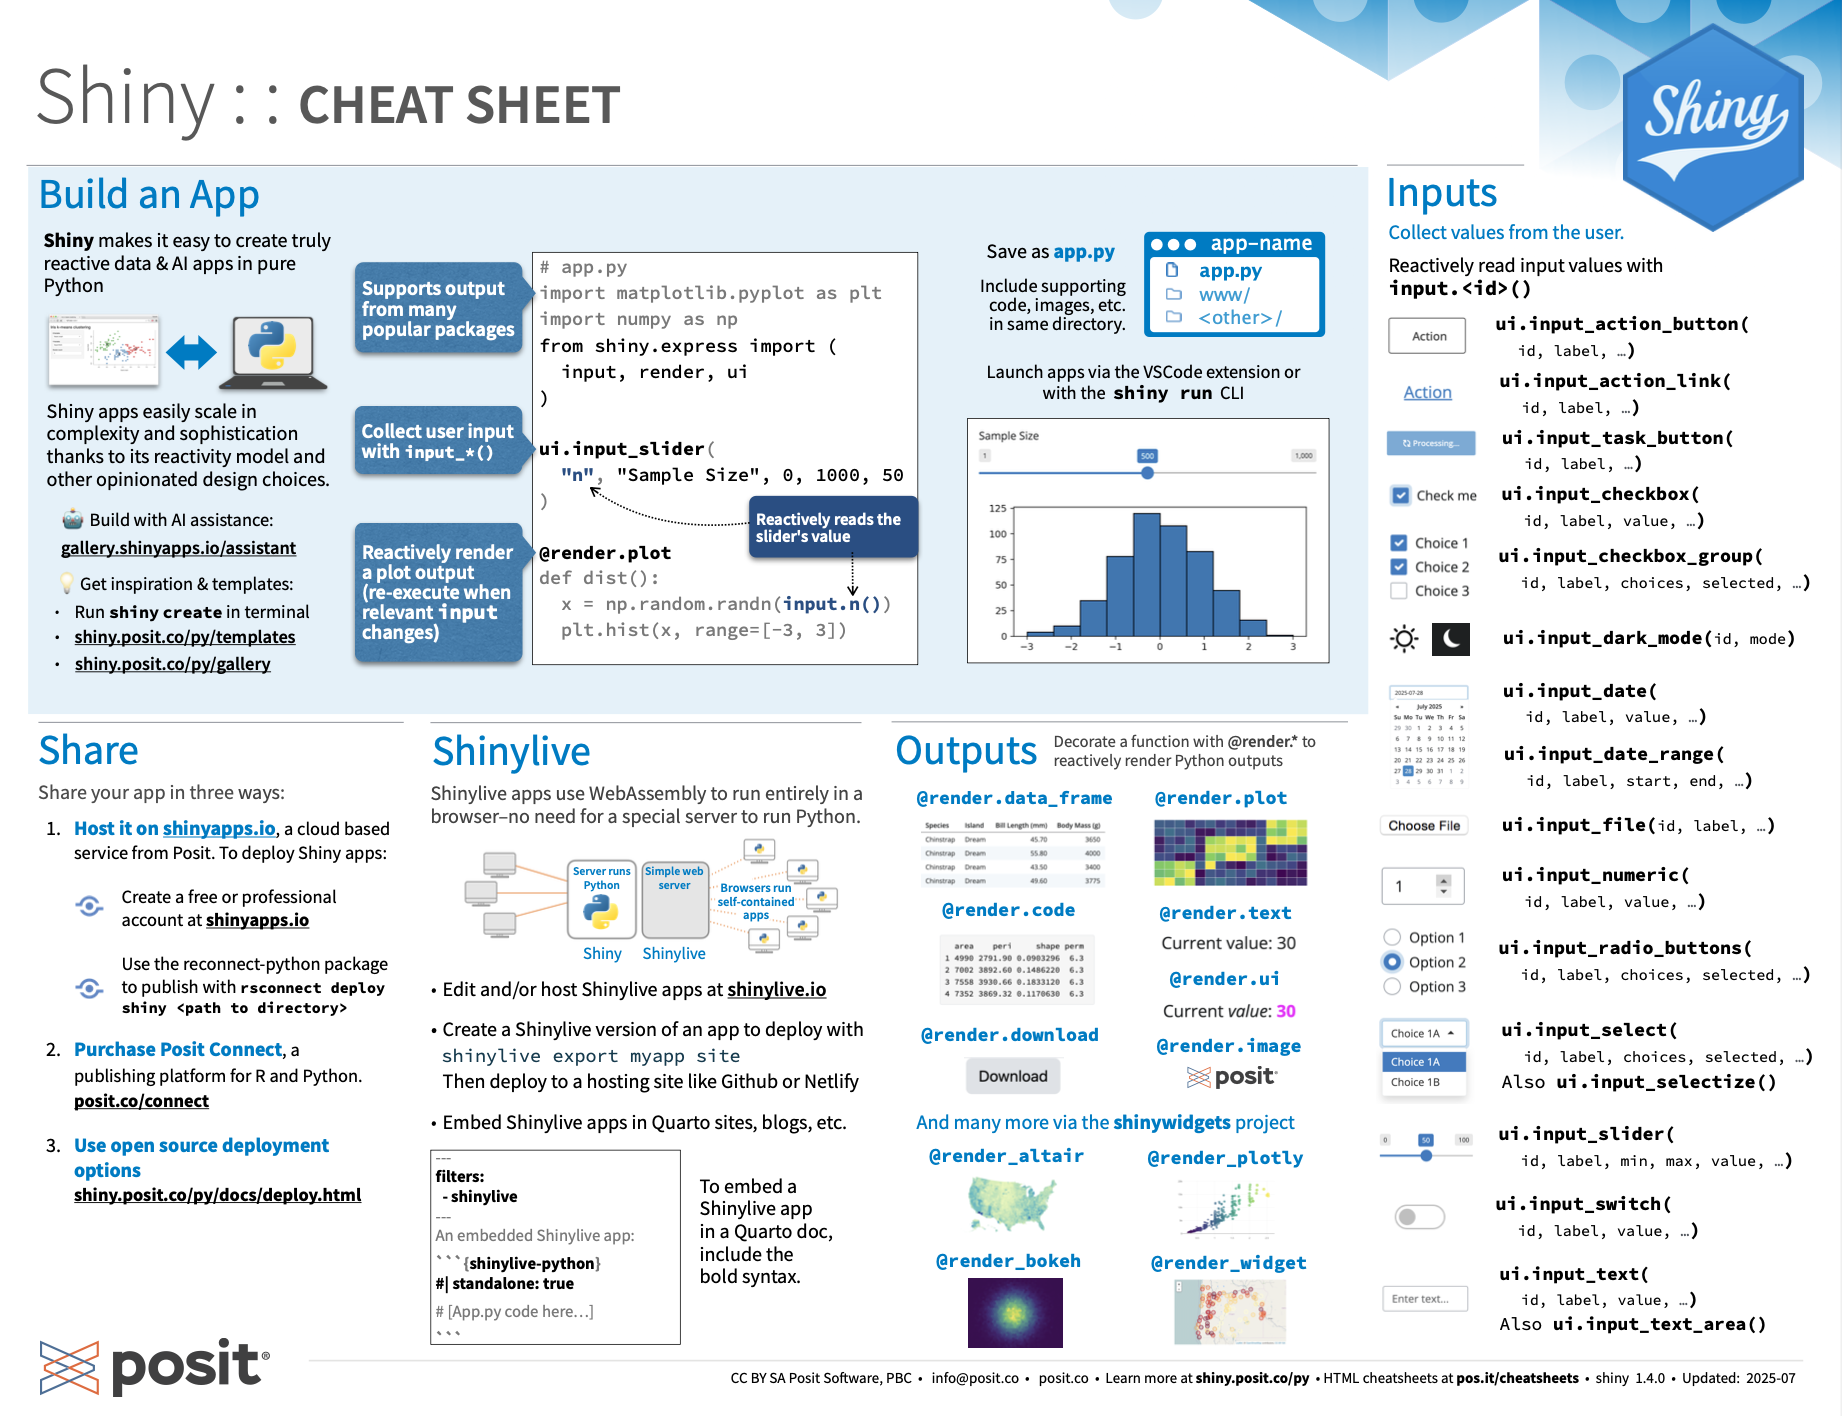
A Shiny app is an interactive web page (ui) powered by a live Python session run by a server (or by a browser with Shinylive).
Users can manipulate the UI, which will cause the server to update the UI’s displays (by running Python code).
Save your app as app.py in a directory with the files it uses.
Run shiny create . in the terminal to generate an app.py file based on a template.
Launch apps with shiny run app.py --reload
from shiny import App, render, ui
import matplotlib.pyplot as plt
import numpy as np

# Nest Python functions to build an HTML interface
app_ui = ui.page_fluid( # Layout the UI with Layout Functions

  #  Add Inputs with ui.input_*() functions
  ui.input_slider(
    "n", "Sample Size", 0, 1000, 20
  ),
  # Add Outputs with ui.ouput_*() functions
  ui.output_plot("dist")
)

def server(input, output, session):

  # For each output, define a function that generates the output
  @render.plot # Specify the type of output with a @render. decorator
  def dist(): # Use the output id as the function name

    # Call the values of UI inputs with input.<id>()
    x = np.random.randn(input.n())
    plt.hist(x, range=[-3, 3])

# Call App() to combine app_ui and server() into an interactive app
app = App(app_ui, server)Shinylive apps use WebAssembly to run entirely in a browser–no need for a special server to run Python.
shinylive export myapp site. Then deploy to a hosting site like Github or Netifly.To embed a Shinylive app in a Quarto doc, include the below syntax.
---
filters:
- shinylive
---

An embedded Shinylive app:

```{r}
#| standalone: true
# [App.py code here...]
```Match ui.output_* functions to @render.* decorators
| decorator | function |
|---|---|
@render.data_frame |
ui.output_data_frame(id) |
@render.image |
ui.output_image(id, width, height, click, dblclick, hover, brush, inline) |
@render.plot |
ui.output_plot(id, width, height, click, dblclick, hover, brush, inline) |
@render.table |
ui.output_table(id) |
@render.text |
ui.output_text(id, container, inline) also ui.output_text_verbatim() |
@render.ui |
ui.output_ui(id, inline, container, ...) |
@render.download |
ui.download_button(id, label, icon, width,...) |
Use a ui.input_*() function to make an input widget that saves a value as input.<id>. Input values are reactive and need to be called as input.<id>().
ui.input_action_button(id, label, icon, width, ...)
ui.input_action_link(id, label, icon, ...)
ui.input_task_button(id, label, icon, label_busy, icon_busy, width, type, auto_reset)
ui.input_checkbox(id, label, value, width)
ui.input_checkbox_group(id, label, choices, selected, inline, width)
ui.input_date(id, label, value, min, max, format, startview, weekstart, language, width, autoclose, datesdisabled, daysofweekdisabled)
ui.input_date_range(id, label, start, end, min, max, format, startview, weekstart, language, separator, width, autoclose)
ui.input_file(id, label, multiple, accept, width, buttonLabel, placeholder, capture)
ui.input_numeric(id, label, value, min, max, step, width)
ui.input_password(id, label, value, width, placeholder)
ui.input_radio_buttons(id, label, choices, selected, inline, width)
ui.input_select(id, label, choices, selected, multiple, selectize, width, size, remove_button, options)
ui.input_selectize(id,label, choices, selected, multiple, width, remove_button, options)
ui.input_slider(id, label, min, max, value, step, ticks, animate, width, sep, pre, post, timeFormat, timezone, dragRange)
ui.input_switch(id, label, value, width)
ui.input_text(id, label, value, width, placeholder, autocomplete, spellcheck) Also ui.input_text_area()
Reactive values work together with reactive functions. Call a reactive value from within the arguments of one of these functions to avoid the error No current reactive context.
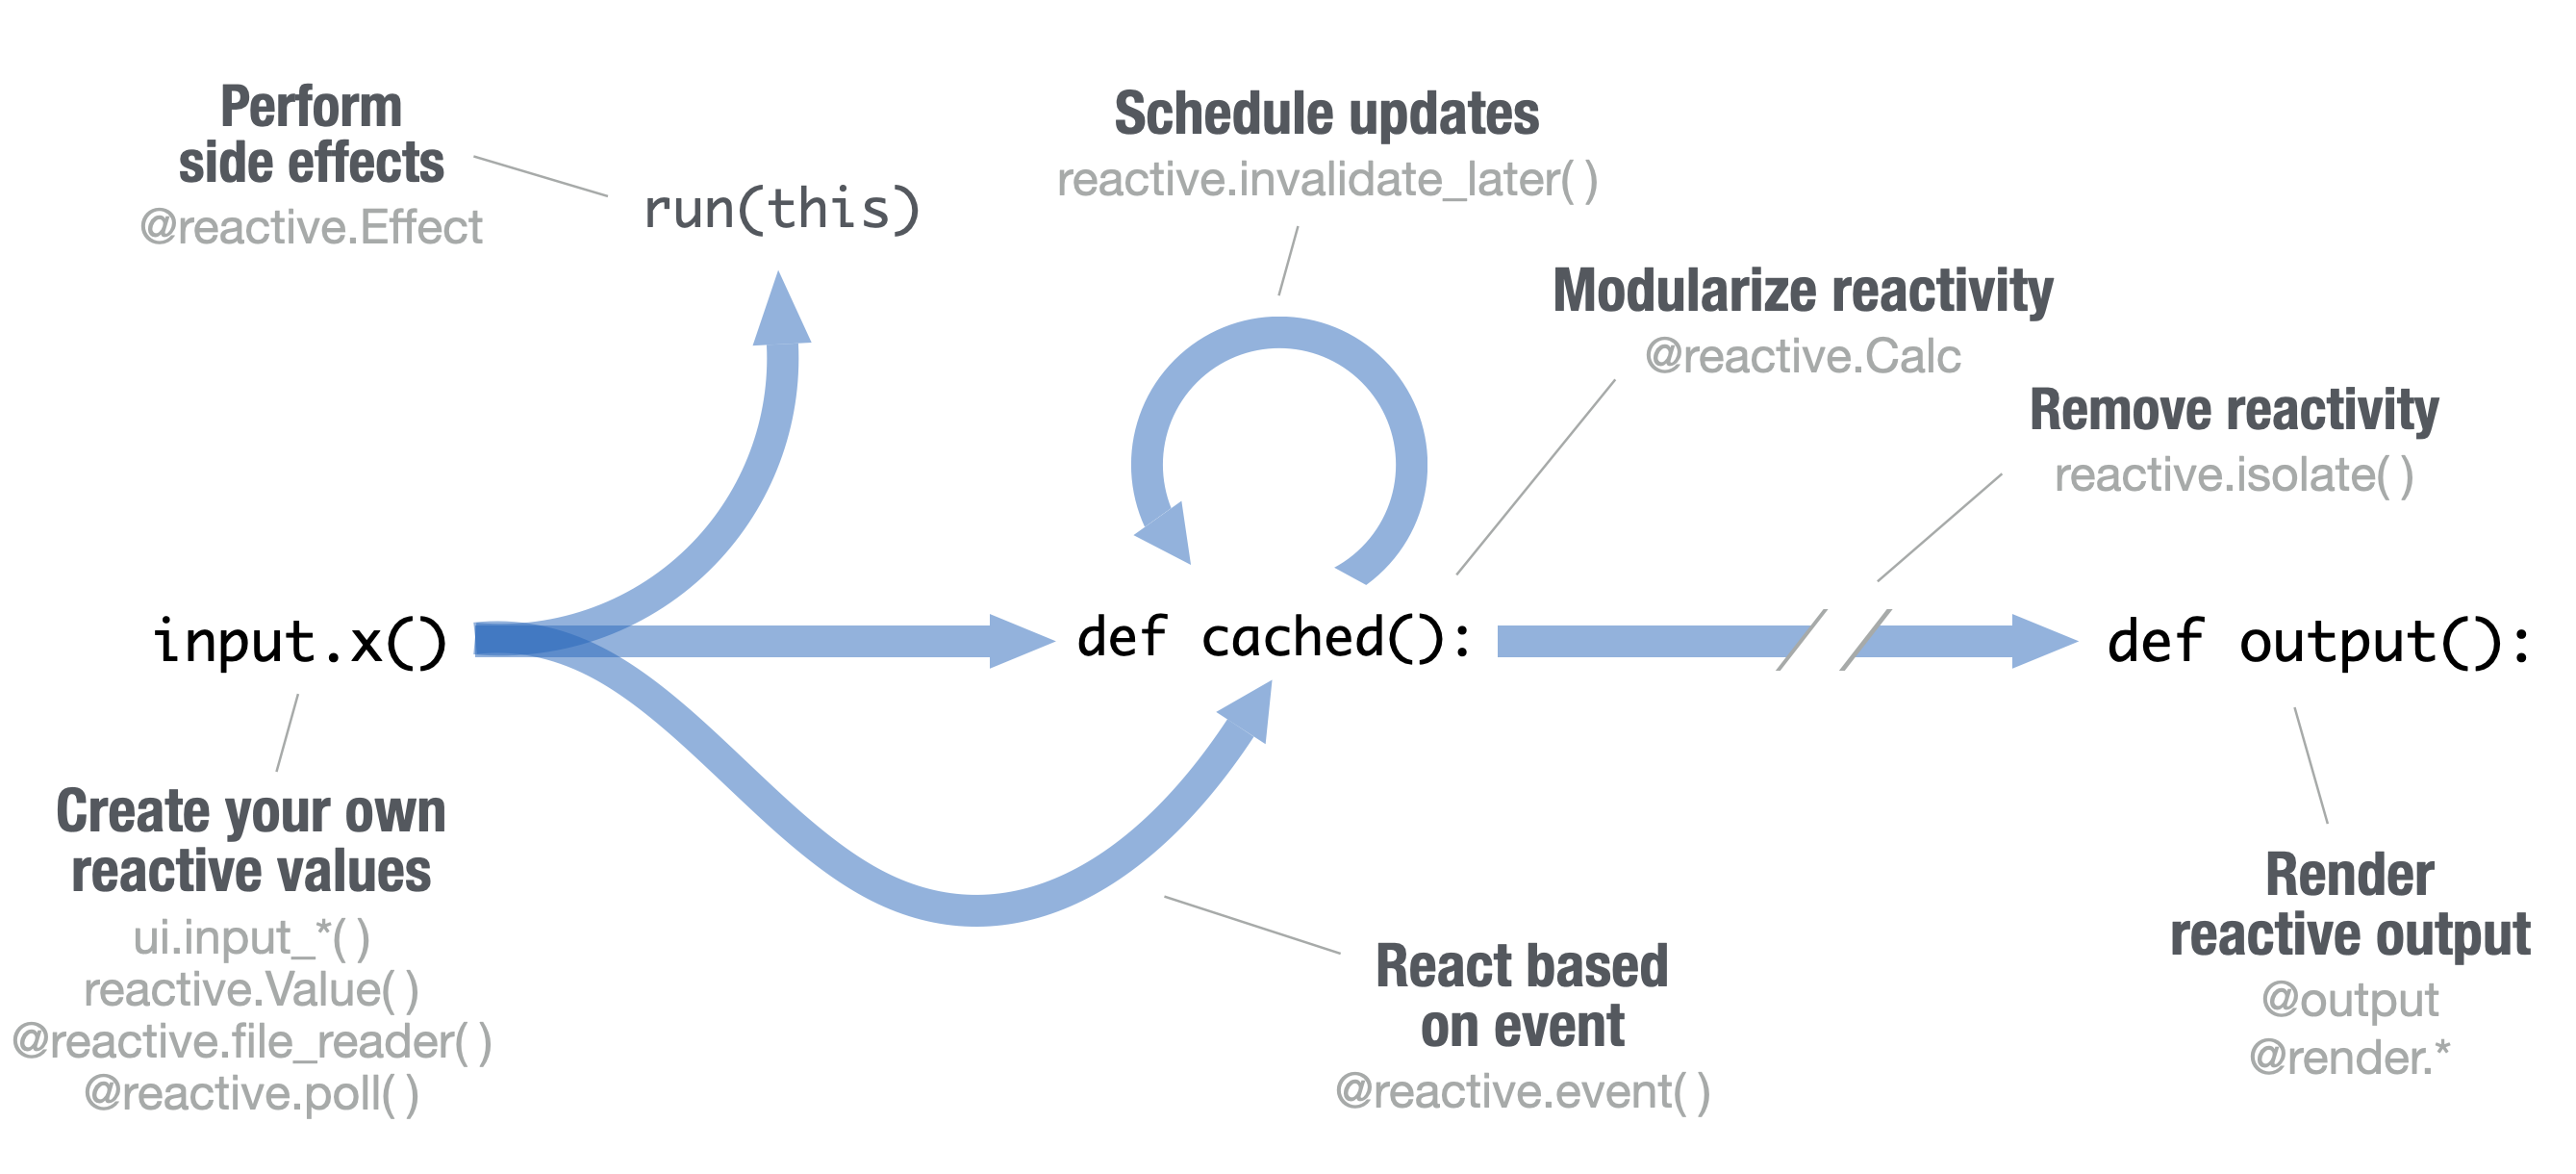
ui.input_*() makes an input widget that saves a reactive value as input.<id>().
reactive.value( ) Creates an object whose value you can set.
#...
app_ui = ui.page_fluid(
    ui.input_text("a", "A")
)

def server(input, output, session):
    rv = reactive.value()
    rv.set(5)
#...@reactive.calc makes a function a reactive expression. Shiny notifies functions that use the expression when it becomes invalidated, triggering recomputation. Shiny caches the value of the expression while it is valid to avoid unnecessary computation.
#...
def server(input, output, session ):
    @reactive.calc
    def re():
        return input.a() + input.b()
#...@reactive.event() Makes a function react only when a specified value is invalidated, here input.a.
#...
def server(input, output, session ):
    @reactive.event(input.a)
    def re():
        return input.b()
#...ui.output_*() adds an output element to the UI.
@render.* decorators render outputs
def <id>(): A function to generate the output
app_ui = ui.page_fluid(
    ui.input_text("a", "A"),
    ui.output_text("b"),
)

def server(input, output, session ):
    @render.text
    def b():
return input.a()@reactive.effect Reactively trigger a function with a side effect. Call a reactive value or use @reactive.event to specify when the function will rerun.
#...
def server(input, output, session ):
    @reactive.effect
    @reactive.event(input.a)
    def print():
        print("Hi")
#...reactive.isolate()Create non-reactive context within a reactive function. Calling a reactive value within this context will not cause the calling function to re-execute should the value become invalid.
# ...
def server(input, output, session):
    @render.text
    def a():
        with reactive.isolate():
            return input.a()
#...Combine multiple elements into a “single element” that has its own properties with a panel function:
ui.panel_absolute()ui.panel_conditional()ui.panel_fixed()ui.panel_main()ui.panel_sidebar()ui.panel_title()ui.panel_well()ui.row() / ui.column()Layout panels with a layout function. Add elements as arguments of the layout functions.
ui.page_sidebar()app_ui = ui.page_sidebar(
ui.sidebar("Sidebar", bg="#f8f8f),
"Main content",
)ui.layout_columns() with `ui.card()app_ui = ui.page_fillable(
ui.layout_columns(
ui.card(
...
),
ui.card(
...
),
)
)Use ui.nav_panel with ui.page_navbar to create tabs:
# navset tab
app_ui = ui.page_navbar(
    ui.nav_panel("A", "Page A content"),
    ui.nav_panel("B", "Page B content"),
    ui.nav_panel("C", "Page C content"),
    title="App with navbar",
    id="page",
)Use the shinyswatch package to add existing bootstrap themes to your Shiny app ui.
import shinyswatch

app_ui = ui.page_fluid(
    # ...
    theme=shinyswatch.theme.darkly,
)
Shiny for Python is quite similar to Shiny for R with a few important differences:
input.<id>()R
input$xPython
input.x()def <id>():R
output$y <-
    renderText(z())
Python
@renderText
    def y():
return z()@reactive.calcR
z <- reactive({
    input$x + 1
})
Python
@reactive.calc
def z():
return input.x()+1@reactive.effectR
a <- observe({
    print(input$x)
})
Python
@reactive.effect
def a():
print(input.x())@reactive.eventR
b <- eventReactive(
    input$goCue,
    {
        input$x + 1
    }
)
Python
@reactive.calc
@reactive.event(input.go_cue )
def b():
return input.x() + 1reactive.value() instead of reactiveVal()R
reactiveVal(1)Python
reactive.value(1)nav_*() instead of *Tab()R
insertTab()
appendTab()
# etc.
Python
nav_insert()
nav_append()
# etc.R
dateInput()
textInput()
# etc.
Python
ui.input_date()
ui.input_text()
# etc.
CC BY SA Posit Software, PBC • info@posit.co • posit.co
Learn more at shiny.posit.co/py/
Updated: 2026-06.
Version: Shiny 0.10.2