Download PDF
Translations (PDF)
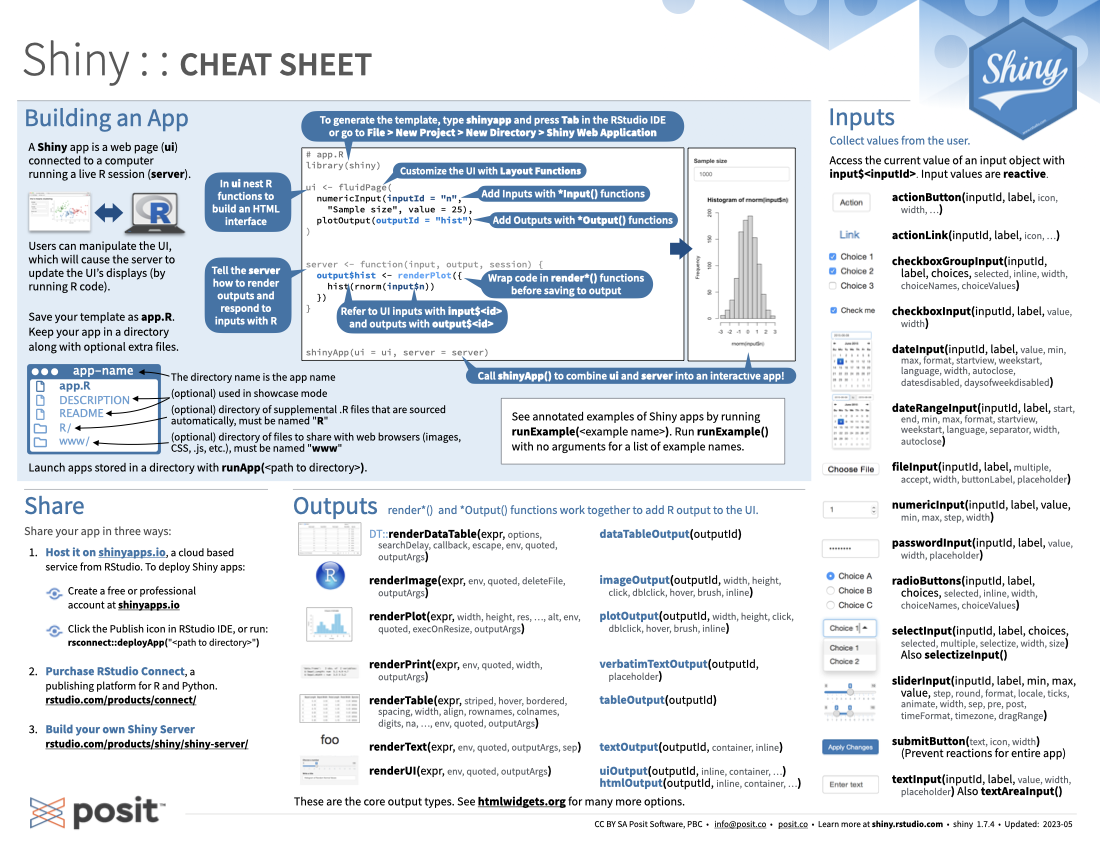
A Shiny app is a web page (ui) connected to a computer running a live R session (server).
library(shiny)Users can manipulate the UI, which will cause the server to update the UI’s display (by running R code).
Save your template as app.R. Keep your app in a directory along with optional extra files.
RwwwLaunch apps stored in a directory with runApp(<path to directory>).
To generate the template, type shinyApp and press Tab in the RStudio IDE or go to File > New Project > New Directory > Shiny Application.
# app.R
library(shiny)

#In ui nest R functions to build an HTML interface
ui <- fluidPage(
  numericInput(inputId = "n", "Sample size", value = 25),
  plotOutput(outputId = "hist")
)
# Customize the UI with Layout Functions
# Add Inputs with *Input() functions
# Add Outputs with *Output() functions


# Tell the server how to render outputs and respond to inputs with R
server <- function(input, output, session) {
  output$hist <- renderPlot({
    hist(rnorm(input$n))
  })
}
# Wrap code in render*() functions before saving to output
# Refer to UI inputs with input$<id> and outputs with output$<id>

# Call shinyApp() to combine ui and server into an interactive app!
shinyApp(ui = ui, server = server)
See annotated examples of Shiny apps by running runExample(<example name>). Run runExample() with no arguments for a list of example names.
render*() and *Output() functions work together to add R output to the UI.
render*() Functions |
*Output() Functions |
|---|---|
DT::renderDataTable(expr, options, searchDelay, callback, escape, env, quoted, outputArgs) |
dataTableOutput(outputId) |
renderImage(expr, env, quoted, deleteFile, outputArgs) |
imageOutput(outputId, width, height, click, dblclick, hover, brush, inline) |
renderPlot(expr, width, height, res, …, alt, env, quoted, execOnResixe, outputArgs |
plotOutput(outputId, width, height, click, dblclick, hover, brush, inline) |
renderPrint(expr, env, quoted, width, outputArgs) |
verbatimTextOutput(outputId, placeholder) |
renderTable(expr, striped, hover, bordered, spacing, width, align, rownames, colnames, digits, na, …, env, quoted, outputArgs) |
tableOutput(outputId) |
renderText(expr, env, quoted, outputArgs, sep) |
textOutput(outputId, container, inline) |
renderUI(expr, env, quoted, outputArgs) |
uiOutput(outputId, inline, container, …)htmlOutput(outputId, inline, container, …) |
These are the core output types. See htmlwidgets.org for many more options.
Collect values from the user.
Access the current value of an input object with input$<inputId>. Input values are reactive.
actionButton(inputId, label, icon, width, ...)
actionLink(inputId, label, icon, ...)
checkboxGroupInput(inputId, label, choices, selected, inline, width, choiceNames, choiceValues)
checkboxInput(inputId, label, value, width)
dateInput(inputId, label, value, min, max, format, startview, weekstart, language, width, autoclose, datesdisabled, daysofweekdisabled)
dateRangeInput(inputId, label, start, end, min, max, format, startview, weekstart, language, separator, width, autoclose)
fileInput(inputId, label, multiple, accept, width, buttonLabel, placeholder)
numericInput(inputId, label, value, min, max, step, width)
passwordInput(inputId, label, value, width, placeholder)
radioButtons(inputId, label, choices, selected, inline, width, choiceNames, choiceValues)
selectInput(inputId, label, choices, selected, multiple, selectize, width, size): Also selectizeInput()
sliderInput(inputId, label, min, max, value, step, round, format, locale, ticks, animate, width, sep, pre, post, timeFormat, timezone, dragRange)
textInput(inputId, label, value, width, placeholder): Also textAreaInput()
Reactive values work together with reactive functions. Call a reactive value from within the arguments of one of these functions to avoid the error Operation not allowed without an active reactive context.
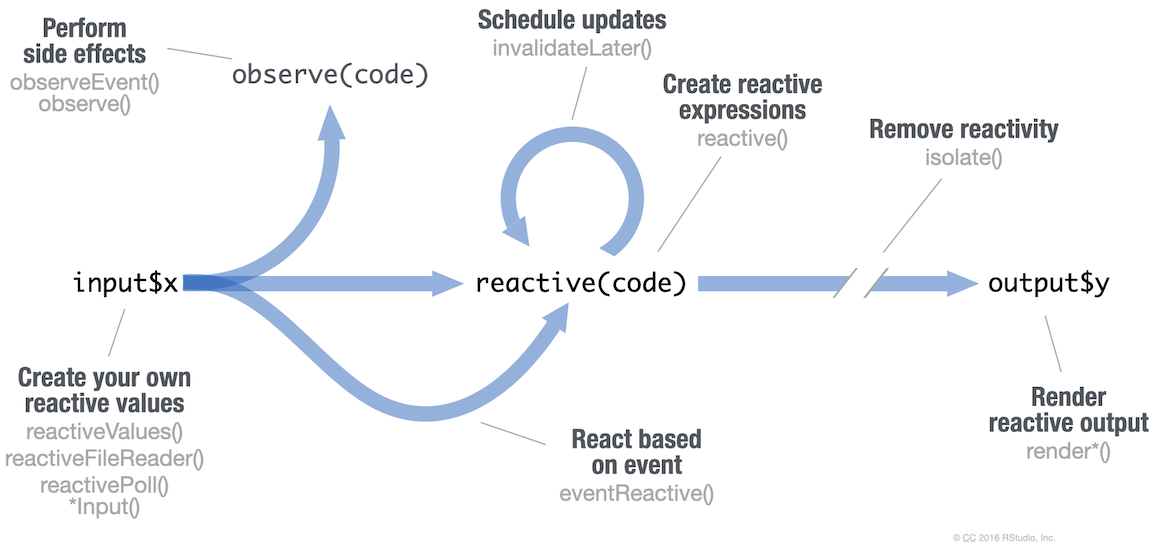
*Input() functions: Each input function creates a reactive value stored as input$<inputId>.
# *Input() example
ui <- fluidPage(
  textInput("a","","A")
)
reactiveVal(): Creates a single reactive values object.
reactiveValues(...): Creates a list of reactive values whose values you can set.
# reactiveVal example
server <- function(input,output){
  rv <- reactiveValues()
  rv$number <- 5
}reactive(x, env, quoted, label, domain):
Reactive expressions:
cache their value to reduce computation
can be called elsewhere
notify dependencies when invalidated
Call the expression with function syntax, e.g. re().
library(shiny)

ui <- fluidPage(
  textInput("a","","A"),
  textInput("z","","Z"),
  textOutput("b")
  )

server <- function(input,output){
  re <- reactive({
    paste(input$a,input$z)
  })
  output$b <- renderText({
    re()
  })
}

shinyApp(ui, server)eventReactive(eventExpr, valueExpr, event.env, event.quoted, value.env, value.quoted, ..., label, domain, ignoreNULL, ignoreInit): Creates reactive expression with code in 2nd argument that only invalidates when reactive values in 1st argument change.
library(shiny)

ui <- fluidPage(
  textInput("a","","A"),
  actionButton("go","Go"),
  textOutput("b")
)

server <- function(input,output){
  re <- eventReactive(
    input$go,{input$a}
  )
  output$b <- renderText({
    re()
  })
}render*() functions: (see front page) Builds an object to display. Will rerun code in body to rebuild the object whenever a reactive value in the code changes. Save the results to output$<outputId>.
library(shiny)

ui <- fluidPage(
  textInput("a","","A"),
  textOutput("b")
)

server <- function(input,output){
  output$b <-
    renderText({
      input$a
  })
}

shinyApp(ui, server)observe(x, env): Creates an observer from the given expression.
observeEvent(eventExpr, handlerExpr, event.env, event.quoted, handler.env, handler.quoted, ..., label, suspended, priority, domain, autoDestroy, ignoreNULL, ignoreInit, once): Runs code in 2nd argument when reactive values in 1st argument change. Alternative to observe``().
library(shiny)

ui <- fluidPage(textInput("a","","A"), actionButton("go","Go"))

server <- function(input,output){
  observeEvent(input$go, {
    print(input$a)
  })
}

shinyApp(ui, server)isolate(expr): Runs a code block. Returns a non-reactive copy of the results.
library(shiny)

ui <- fluidPage(
  textInput("a","","A"),
  textOutput("b")
)

server <- function(input,output){
  output$b <-
    renderText({
      isolate({input$a})
    })
}

shinyApp(ui, server)An app’s UI is an HTML document.
Use Shiny’s functions to assemble this HTML with R.
fluidPage(
  textInput("a","")
)
Returns HTML:
<div class="container-fluid">
  <div class="form-group shiny-input-container">
    <label for="a"></label>
    <input id="a" type="text" class="form-control" value=""/>
  </div>
</div>
Add static HTML elements with tags, a list of functions that parallel common HTML tags, e.g. tags$a(). Unnamed arguments will be passed into the tag; named arguments will become tag attributes.
Run names(tags) for a complete list. tags$h1("Header") -> <h1>Header</h1>
The most common tags have wrapper functions. You do not need to prefix their names with tags$.
ui <- fluidPage(
  h1("Header 1"), # <h1>Header 1</h1>
  hr(), # <hr>
  br(), # <br>
  p(strong("bold")), # <p><strong>bold</strong></p>
  p(em("italic")), # <p><em>italic</em></p>
  p(code("code")), # <p><code>code</code></p>
  a(href="", "link"), # <a href="">link</a>
  HTML("<p>Raw html</p>") # display raw html
)
To include a CSS file, use includeCSS(), or
Place the file in the www subdirectory
Link to it with:
tags$head(
  tags$link(
    rel = "stylesheet",
    type = "text/css",
    href = "<file name>"
    )
  )
To include JavaScript, use includeScript(), or
Place the file in the www subdirectory
Link to it with:
tags$head(tags$script(src = "<file name>"))To include an image:
Place the file in the www subdirectory
Link to it with:
img(src = "<file name>")Use the bslib package to lay out the your app and its components.
page_sidebar() - A sidebar page
page_navbar() - Multi-page app with a top navigation bar
page_fillable() - A screen-filling page layout
page()
page_fluid()
page_fixed()
layout_columns() - Organize UI elements into Bootstrap’s 12-column CSS grid
layout_column_wrap() - Organize elements into a grid of equal-width columns
navset_tab() - Tabbed navigation container
navset_pill() - Creates a navigation container that behaves exactly like navset_tab(), but the tab toggles are pills or button-shaped
navset_underline() - Creates a navigation container that behaves exactly like navset_tab() and navset_pill(), but the active/focused navigation links are styled with an underline
nav_panel() - Content to display when given item is selected
nav_menu() - Create a menu of nav items
nav_item() - Place arbitrary content in the nav panel
nav_spacer() - Add spacing between nav items
Also dynamically update nav containers with nav_select(), nav_insert(), nav_remove(), nav_show(), nav_hide().
Use the bslib package to add existing themes to your Shiny app ui, or make your own.
library(bslib)
ui <- fluidPage(
  theme = bs_theme(
    boothswatch = "darkly",
    ...
  )
)bootswatch_themes(): Get a list of themes.Build your own theme by customizing individual arguments.
bs_theme(
  bg = "#558AC5",
  fg = "#F9B02D",
  ...
)
?bs_theme for a full list of arguments.
bs_themer(): Place within the server function ot use the interactive theming widget.
CC BY SA Posit Software, PBC • info@posit.co • posit.co
Learn more at shiny.rstudio.com
Updated: 2025-07.
packageVersion("shiny")[1] '1.11.1'