Overview
Exercises are interactive R code chunks that allow readers to directly execute R code and see its results.
Exercise Options
There are many options associated with tutorial exercises (all of which are described in more detail below):
| Option | Description |
|---|---|
exercise.cap |
Caption for exercise chunk (defaults to “Code”) |
exercise.eval |
Whether to pre-evaluate the exercise so the reader can see some
default output (defaults to FALSE). |
exercise.lines |
Lines of code for exercise editor (default to size of code chunk). |
exercise.pipe |
The code to insert when the user presses
Ctrl/Cmd + Shift + M (defaults to |> for R
>= 4.1.0, otherwise %>%). |
exercise.timelimit |
Number of seconds to limit execution time to (defaults to 30). |
exercise.checker |
Function used to check exercise answers (e.g.,
gradethis::grade_learnr()). |
exercise.blanks |
Regular expression to find blanks requiring replacement in the exercise code. See Checking Blanks below. |
exercise.error.check.code |
A string containing R code to use for checking code when an exercise
evaluation error occurs (e.g.,
"gradethis::grade_code()"). |
exercise.completion |
Whether to enable code completion in the exercise editor. |
exercise.diagnostics |
Whether to enable code diagnostics in the exercise editor. |
exercise.startover |
Whether to include a “Start Over” button for the exercise. |
exercise.warn_invisible |
Whether to display an invisible result warning if the last value returned is invisible. |
exercise.reveal_solution |
Whether or not the solution should be revealed to the user (defaults to `TRUE`). See Hiding Solutions below. |
Note that these options can all be specified either globally or
per-chunk. For example, the following code sets global default options
using the setup chunk and also sets some local options on
the addition chunk:
```{r setup, include=FALSE}
library(learnr)
tutorial_options(exercise.timelimit = 60)
```

```{r addition, exercise=TRUE, exercise.timelimit = 60}
1 + 1
```
Exercise Support Chunks
There are also some other specialized chunks that can be used with an exercise chunk. These chunks a linked together
Exercise
-setupchunks enable you to execute code to setup the environment immediately prior to executing submitted code.Exercise
-solutionchunks enable you to provide a solution to the exercise that can be optionally viewed by users of the tutorial.Exercise
-hintchunks are used to provide a series of hints to help the user progress through the exercise.Exercise
-check,-code-check, and-error-checkchunks are used to provide logic for checking the user’s attempt to solve the exercise.Finally, exercise
-testschunks can store test cases or testing code related to the exercise.
The use of these special chunks is also described in detail below.
Exercise Evaluation
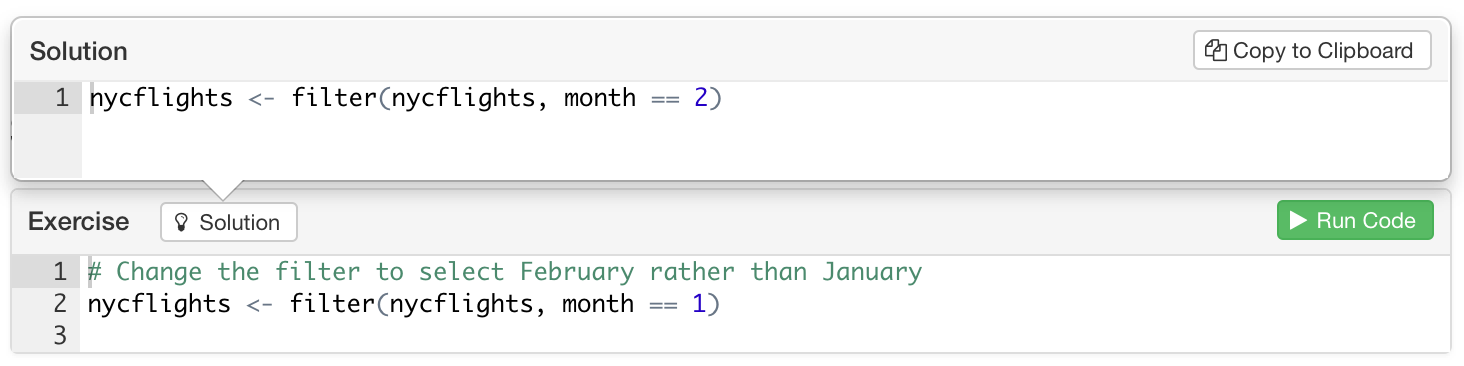
By default, exercise code chunks are NOT pre-evaluated (i.e there is no initial output displayed for them). However, in some cases you may want to show initial exercise output (especially for exercises like the ones above where the user is asked to modify code rather than write new code from scratch).
You can arrange for an exercise to be pre-evaluated (and its output
shown) using the exercise.eval chunk option. This option
can also be set either globally or per-chunk:
```{r setup, include=FALSE}
library(learnr)
tutorial_options(exercise.eval = TRUE)
```

```{r filter, exercise=TRUE, exercise.eval=FALSE}
# Change the filter to select February rather than January
filter(nycflights, month == 1)
```
Exercise Setup
Code chunks with exercise=TRUE are evaluated within
standalone environments. This means that they don’t have access to
previous computations from within the document. This constraint is
imposed so that users can execute exercises in any order (i.e. correct
execution of one exercise never depends on completion of a prior
exercise).
Exercise Setup Chunks
You can arrange for setup code to be run before evaluation of an exercise to ensure that the environment is primed correctly. There are three ways to provide setup code for an exercise:
- Add code to a global
setupchunk - Create a shared setup chunk
- Create an exercise-specific setup chunk
Each of these is described in more detail below. Note that you may also chain setup chunks, which is particularly helpful when exercises build upon each other.
Add code to the global setup chunk
Code in the global setup chunk is run once at the
startup of the tutorial and is shared by all exercises within the
tutorial. For example:
```{r setup, include=FALSE}
nycflights
Create a shared setup chunk
If you don’t want to rely on global setup but would rather create
setup code that’s used by only a handful of exercises you can use the
exercise.setup chunk attribute to provide the label of
another chunk that will perform setup tasks. To illustrate, we’ll
re-write the previous example to use a shared setup chunk named
prepare-flights:
Create an exercise-specific -setup chunk
learnr will automatically associate any chunk with a
label in the format <exercise>-setup as a setup chunk
specifically associated with <exercise>, where
<exercise> is replaced with the label of the exercise
chunk. For example, the filter-setup chunk will be used as
the setup chunk for the filter exercise:
```{r filter-setup}
nycflights
Chained setup chunks
If may also chain setup chunks where each setup chunk inherits its
parent setup chunk using the exercise.setup chunk option.
(Note: You must use exercise.setup for
chaining. You cannot rely on the -setup suffix labeling
scheme.) learnr will keep following the trail of
exercise.setup chunks until there are no more chunks to be
found. To demonstrate, we can convert the first exercise in the above
examples to be another setup chunk called filtered-flights
with its exercise.setup=prepare-flights. This will now
filter the data and store it and can be referenced inside the
arrange exercise:
```{r prepare-flights}
nycflights
You can chain use exercise chunks in the setup chunk chain, but keep
in mind that the code as it appears in the R Markdown source is used to
serve as the setup code, not the user input. For example, if you turned
filtered-flights back to an exercise, the pre-filled code
is used as setup for the arrange exercise that use it as
its setup:
```{r prepare-flights}
nycflights
Using Files in Exercises
Occasionally, you may write an exercise that requires users to
interact with files on disk, such as data files in .csv or
.rds format. learnr will look for a folder
named data/ in the same directory as the tutorial source
and, if present, will make this directory available to users in all
exercises in the tutorial.
To ensure consistency between each evaluation of the user’s code,
users interact with a temporary copy of the original directory. This
way, users cannot overwrite or delete the original files. Additionally,
in the exercise, the directory is always called data/.
There are three ways authors can include files for use in exercises:
Store the files in a
data/directory in the same directory as the tutorial.Use the setup chunk to download or write the files to a
data/directory.Use the
tutorial.data_dirglobal option or theTUTORIAL_DATA_DIRenvironment variables to specify a path to a data directory.
In the example below, the global setup chunk is used to write
data/flights_jan.csv and users are asked to load this file
with read_csv().
```{r setup}
library(tidyverse)

flights_jan %
  filter(month == 2)

dir.create("data",  showWarnings = FALSE)
write_csv(flights_jan, "data/flights_jan.csv")
```

```{r read-flights, exercise=TRUE}
read_csv("data/flights_jan.csv")
```
Hints and Solutions
You can optionally provide a hint or solution for each exercise that can be optionally displayed by users. Hints can be based on either R code snippets or on custom markdown/HTML content.
R Code Hints
To create a hint or solution based on R code simply create a new code chunk with “-hint” or “-solution” chunk label suffix. For example:
```{r filter, exercise=TRUE}
# Change the filter to select February rather than January
nycflights
A “Hint” or “Solution” button is added to the left side of the exercise header region:
Markdown Hints
To create a hint based on custom markdown content simply add a
<div> tag with an id attribute that
marks it as hint for your exercise (e.g. “filter-hint”). For
example:
```{r filter, exercise=TRUE}
# filter the flights table to include only United and American flights
flights
```


**Hint:** You may want to use the dplyr `filter` function.
The content within the <div> will be displayed
underneath the R code editor for the exercise whenever the user presses
the “Hint” button.
Multiple Hints
For R code hints you can provide a sequence of hints that reveal progressively more of the solution as desired by the user. To do this create a sequence of indexed hint chunks (e.g. “-hint-1”, “-hint-2,”-hint-3”, etc.) for your exercise chunk. For example:
```{r filter, exercise=TRUE}
# filter the flights table to include only United and American flights
flights
```

```{r filter-hint-1}
filter(flights, ...)
```

```{r filter-hint-2}
filter(flights, UniqueCarrier=="AA")
```

```{r filter-hint-3}
filter(flights, UniqueCarrier=="AA" | UniqueCarrier=="UA")
```
Hiding Solutions
By default, the exercise solution is made available to the user with
the “Solution” or “Hint” button (if there are hints those will appear
first). If you would prefer not to reveal the solution to an exercise,
you can disable revealing the solution by adding
exercise.reveal_solution = FALSE to the chunk options of
either the exercise or its corresponding *-solution
chunk.
You can also set this option globally in the global
setup chunk with tutorial_options(). When set
this way, the chunk-level option will take precedence over the global
option so that you can choose to always reveal or hide the solution to a
particular exercise. The current default is to reveal exercise
solutions, but in a future version of learnr the default behavior will
change to hide solutions.
Progressive Reveal
You might want users of your tutorials to see only one sub-topic at a
time as they work through the material (this can be helpful to reduce
distractions and maintain focus on the current task). If you specify the
progressive option then all Level 3 headings
(###) will be revealed progressively. For example:
---
title: "Hello, Tutorial!"
output:
  learnr::tutorial:
    progressive: true
runtime: shiny_prerendered
---
You can also specify this option on a per topic basis using the
data-progressive attribute. For example, the following code
enables progressive rendering for a single topic:
## Topic 1 {data-progressive=TRUE}
You can also use data-progressive=FALSE to disable
progressive rendering for an individual topic if the global
progressive option is TRUE.
Progressive reveal provides an easy way to cue exercises one at a
time: place each exercise under its own Level 3 header
(###). This can be useful when a second exercises builds on
the first, giving away the answer to the first.
Note that this feature is only available if you are using the learnr::tutorial R
Markdown format (other custom formats may have their own internal
mechanisms for progressive reveal).
Exercise Skipping
When the progressive option is set to true, the tutorial
will require students to complete any exercises in a sub-section before
advancing to the next sub-section.
You may want to allow users of your tutorials to skip through exercises that they can’t quite figure out. This might especially be true if you want users to be able to optionally see the next exercise even if they haven’t completed the prior one.
If you specify the allow_skip option then students will
be able to advance through a sub-section without completing the
exercises. For example:
---
title: "Hello, Tutorial!"
output:
  learnr::tutorial:
    progressive: true
    allow_skip: true
runtime: shiny_prerendered
---
You can also specify this option on a per sub-topic basis using the
data-allow-skip attribute. For example, the following code
enables exercise skipping within a single sub-topic:
### Exercise 2 {data-allow-skip=TRUE}
You can also use data-allow-skip=FALSE to disable
exercise skipping rendering for an individual sub-topic if the global
allow-skip option is TRUE.
Exercise Checking
learnr provides allows full control over feedback
provided to exercise submissions via exercise.checker in
tutorial_options(). We’ll eventually cover how to implement
a custom exercise.checker, but for sake of demonstration,
this section uses gradethis’s
approach to exercise checking, which doesn’t require knowledge of
exercise.checker (NOTE:
gradethis is still a work-in-progress. You may want to
consider alternatives such as checkr).
To use gradethis’s approach to exercise checking inside
of learnr, just call gradethis_setup() in
a setup chunk, which will set
tutorial_options(exercise.checker = gradethis::grade_learnr)
(among other things).
Checking Results
Checking of exercise results may be done through a
*-check chunk. With a gradethis setup,
results can be graded with grade_result(), like so:
```{r setup, include=FALSE}
library(learnr)
gradethis::gradethis_setup()
```

* Submit `1+1` to receive a correct grade.

```{r exercise1, exercise = TRUE}

```

```{r exercise1-check}
grade_result(
  pass_if(~identical(.result, 2))
)
```
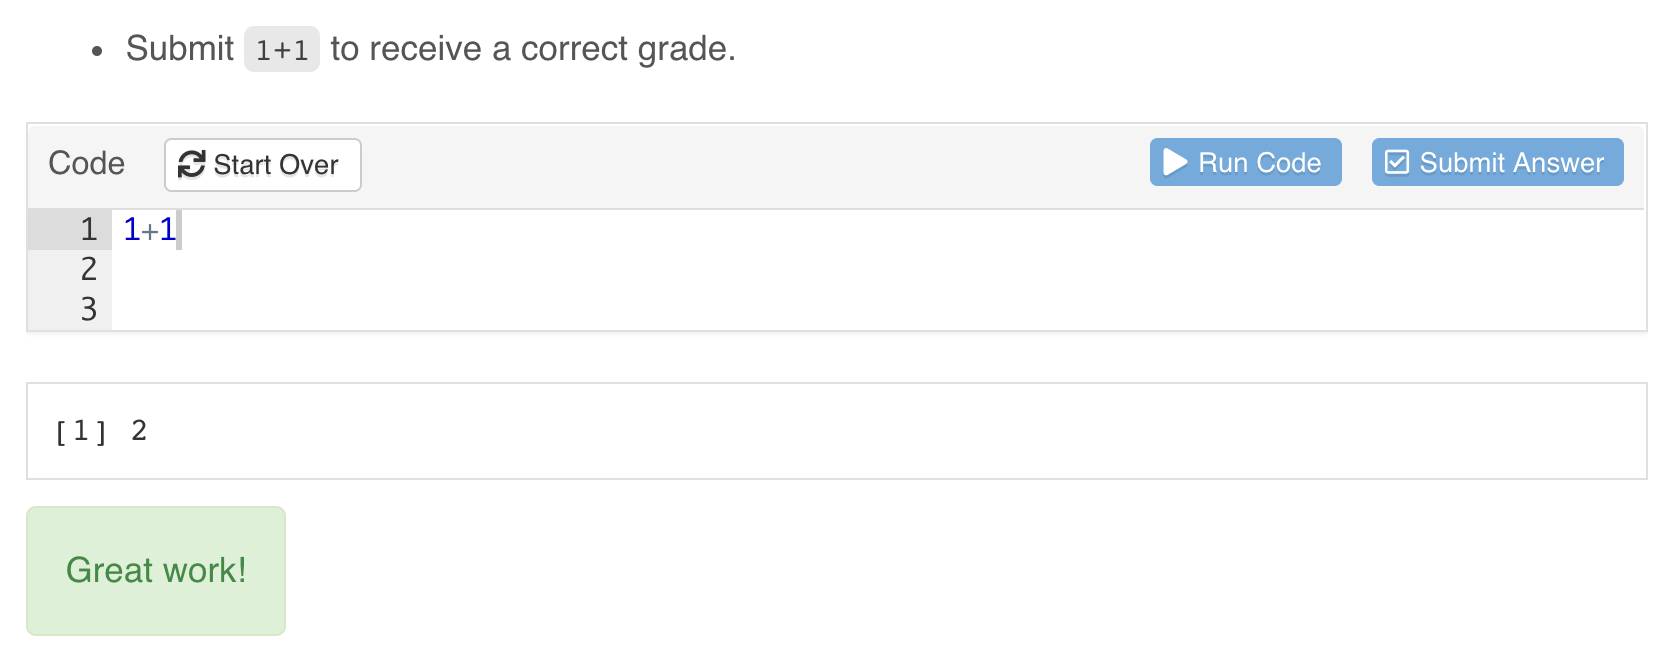
When an exercise *-check chunk is provided,
learnr provides an additional “Submit Answer” button,
which allows users to experiment with various answers before formally
submitting an answer:
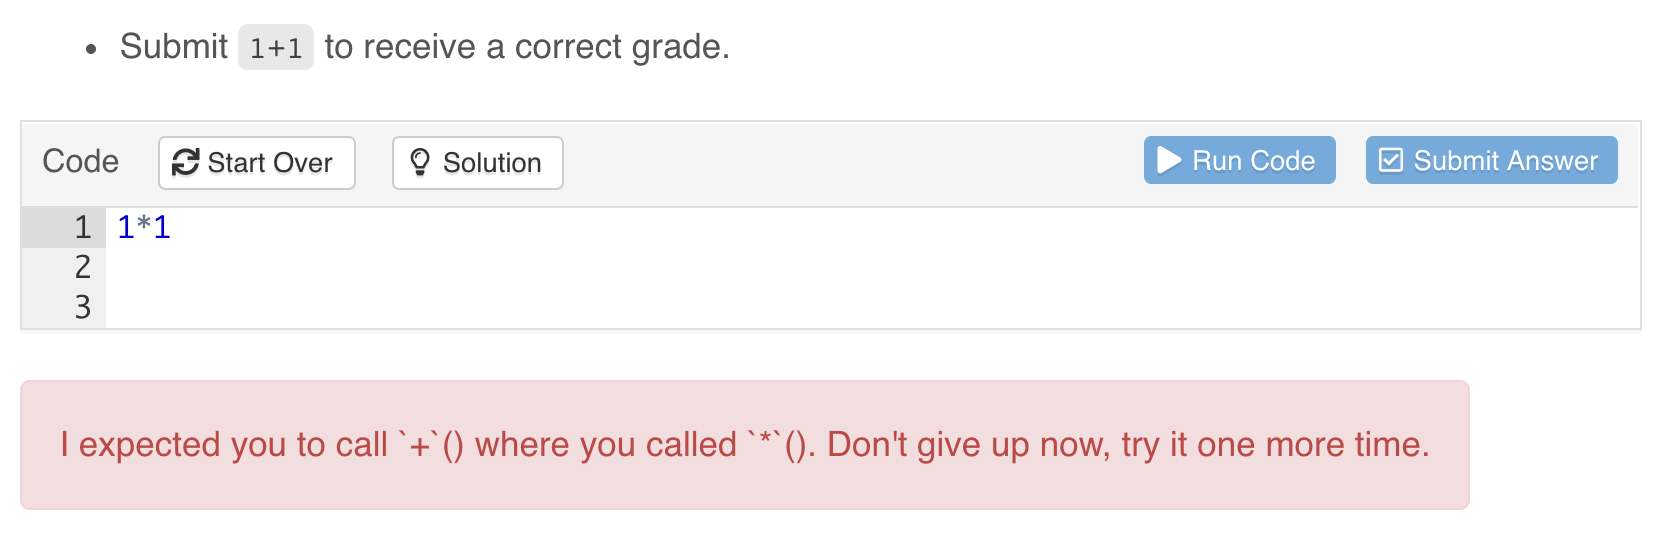
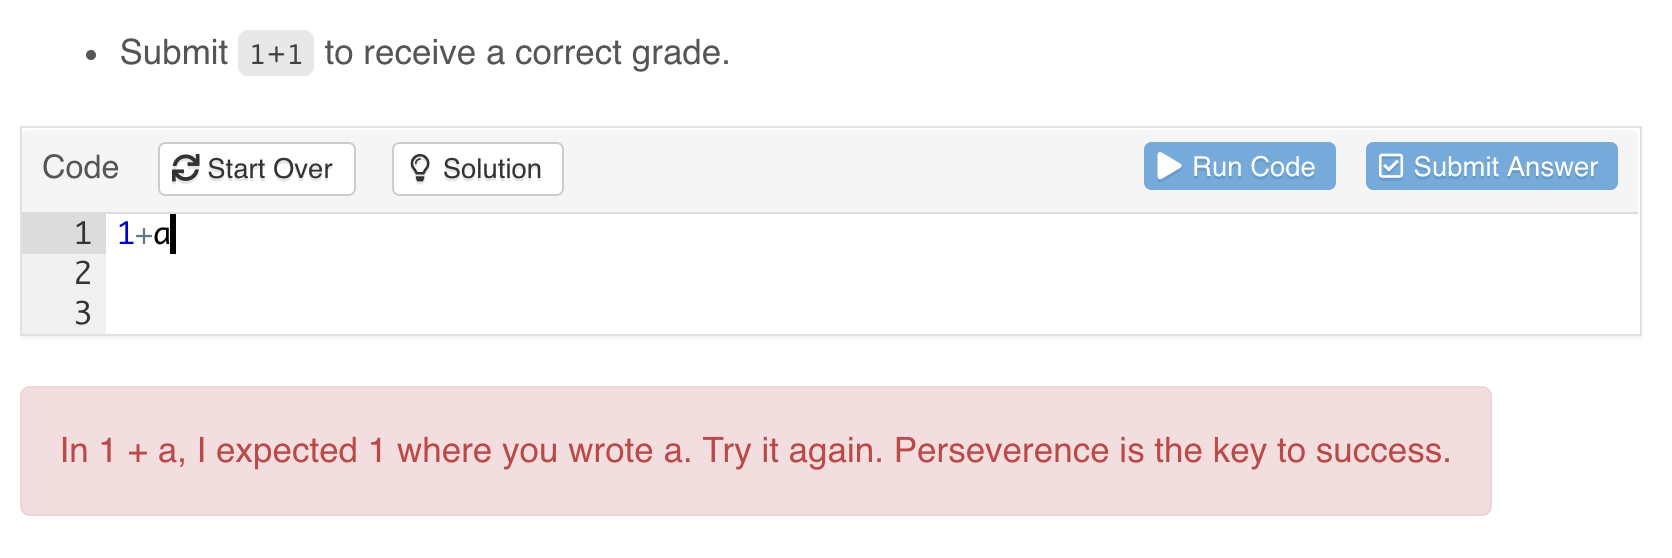
Checking Code
Checking of exercise code may be done through a
*-code-check chunk. With a gradethis
setup, if you supply a *-solution chunk and call
grade_code() inside *-code-check, then you get
detection of differences in the R syntax between the submitted exercise
code and the solution code.
```{r setup, include=FALSE}
library(learnr)
gradethis::gradethis_setup()
```

* Submit `1+1` to receive a correct grade.

```{r exercise1, exercise = TRUE}

```

```{r exercise1-solution}
1+1
```

```{r exercise1-code-check}
grade_code()
```
It’s worth noting that, when a *-code-check chunk is
supplied, the check is done prior to evaluation of the exercise
submission, meaning that if the *-code-check chunk returns
feedback, then that feedback is displayed, no exercise code is
evaluated, and no result check is performed.
Checking Blanks
Occasionally, you may include blanks in the pre-filled code in your
exercise prompts — sections of the code in the exercise prompt that
students should fill in. By default, learnr will detect
sequences of three or more underscores, e.g. ____ as
blanks, regardless of where they appear in the user’s submitted
code.
Fill in the blank to create an expression that adds up to **4**.

```{r blank, exercise = TRUE, exercise.blanks = "___+"}
1 + ____
```

```{r blank-solution}
1 + 3
```
![]()
You can choose your own blank pattern by setting the
exercise.blanks chunk option to a regular expression that
identifies your blanks. You may also set
exercise.blanks = TRUE to use the default
learnr blank pattern, or
exercise.blanks = FALSE to skip blank checking altogether.
Globally tutorial_options() can be used to set the value of
this argument for all exercises.
Submitted code with blanks will still be evaluated, but the other exercise checks will not be performed. This lets the student see the output of their code—which may produce a valid result—but still draws the student’s attention to the code that needs to be completed.
Checking Errors
In the event that an exercise submission generates an error, checking
of the code (or its result, which is an error condition) may be done
through either a *-error-check chunk or through the global
exercise.error.check.code option. If an
*-error-check chunk is provided, you must also include a
*-check chunk, typically to provide feedback in case the
submission doesn’t generate an error.
With a gradethis setup,
exercise.error.check.code is set to
grade_code(). This means that, by default, users will
receive intelligent feedback for a submission that generates an error
using the *-solution chunk, if one is provided.
To learn more about grading exercises with
gradethis, see its grading demo (gradethis::gradethis_demo()).
Custom Checking
If you need custom exercise checking logic that isn’t already
provided grading packages like gradethis,
then you may want to write your own exercise.checker
function. This function is called on exercise submission whenever
*-check or *-code-check chunks exist. When
called, this function receives all the information that
learnr knows about the exercise at the time of the
checking, including the user_code,
solution_code, check_code, exercise
environments, the last_value (if any), and the
stage of checking. Checking can be performed at three
different time points, so the values supplied can differ depending on
the time point:
- Before exercise evaluation, at this stage:
-
stageis"code_check". -
check_codecontains*-code-checkchunk code. -
envir_result,evaluate_result, andlast_valueare allNULL.
-
- During evaluation, when an error occurs:
-
stageis"error_check". -
check_codecontains*-error-checkchunk code. -
last_valuecontains the error condition object.
-
- After exercise evaluation, at this stage:
-
stageis"check". -
check_codecontains*-checkchunk code. -
last_valuecontains the last printed value.
-
If, at any one of these stages, feedback should be provided, then
exercise.checker should return an R list with, at the very
least, a correct flag and feedback
message:
| Field | Description |
|---|---|
message |
Feedback message. Can be a plain character vector or can HTML produced via the htmltools package. |
correct |
TRUE/FALSE logical value indicating whether the submitted answer was correct. |
type |
Feedback type (visual presentation style). Can be “auto”, “success”, “info”, “warning”, “error”, or “custom”. Note that “custom” implies that the “message” field is custom HTML rather than a character vector. |
location |
Location for feedback (“append”, “prepend”, or “replace”). |
Below is a rough sketch of how one might implement an
exercise.checker function.
```r
custom_checker
See the table below for a full description of all the arguments
supplied to exercise.checker.
| Argument | Description |
|---|---|
label |
Label for exercise chunk. |
user_code |
R code submitted by the user. |
solution_code |
Code provided within the “-solution” chunk for the exercise. |
check_code |
Code provided within the “-check” chunk for the exercise. |
envir_result |
The R environment after the execution of the chunk. |
evaluate_result |
The return value from the evaluate::evaluate
function. |
envir_prep |
A copy of the R environment before the execution of the chunk. |
last_value |
The last value of the evaluated chunk. |
engine |
The engine value of the evaluated chunk. |
stage |
The current checking stage. |
... |
Unused (include for compatibility with parameters to be added in the future) |
Test Code or Cases
In some cases, you may want to record test cases — examples of alternative solutions, common mistakes made by students, edge cases that are missed by your checking code, etc.
You can place this test code in a *-tests chunk. It will
be preserved in the tutorial’s R Markdown source and stored in learnr’s
internal data for the exercise, but it won’t appear in the tutorial
text. learnr doesn’t currently provide a mechanism for testing
exercises, but support for exercise testing is on the roadmap for future
development.
```{r addition, exercise = TRUE}

```

```{r addition-solution}
1 + 1
```

```{r addition-tests}
1 + 1

# one plus two ----
1 + 2

# one plus three ----
1 + 3

# one equals three ----
1 = 3

# 2 minus one ----
2 - 1
```
Exercise Caption
By default exercises are displayed with caption of “Code”. However, in some cases you may want either a custom per-chunk caption or a generic caption with a different connotation (e.g. “Exercise” or “Sandbox”). For example:
```{r setup, include=FALSE}
library(learnr)
tutorial_options(exercise.cap = "Sandbox")
```
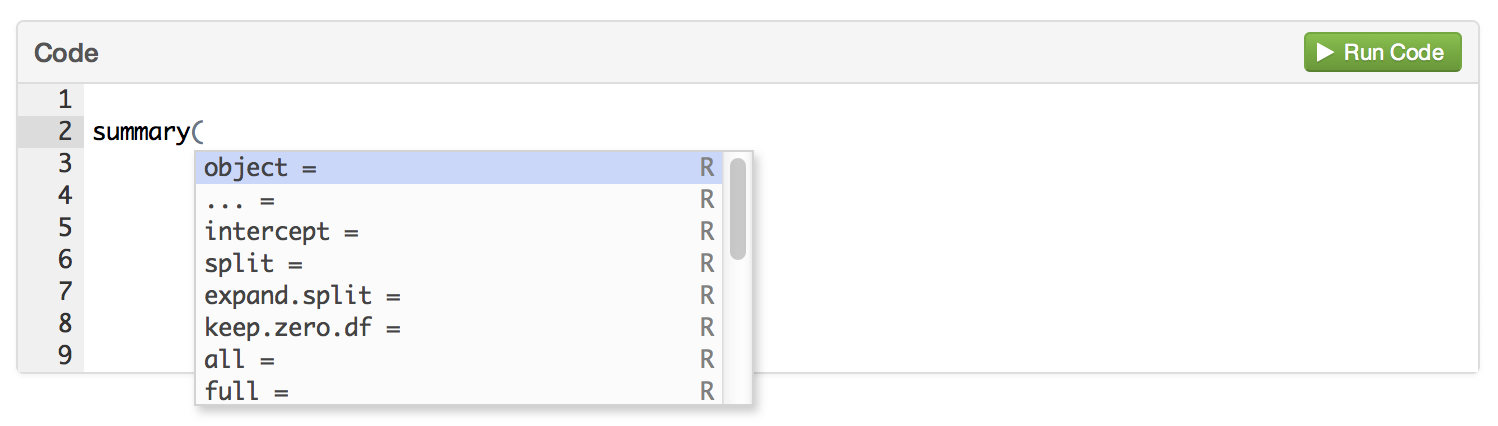
Code Assistance
By default, code completions are automatically provided as users type within the exercise editor:
You can optionally disable code completion (either globally or on a
per-chunk basis) using the exercise.completion option. For
example, the following illustrates turning off completions globally then
enabling them for an individual chunk:
```{r setup, include=FALSE}
library(learnr)
tutorial_options(exercise.completion = FALSE)
```

```{r histogram-plot, exercise=TRUE, exercise.completion=TRUE}

```
Similarly, simple code diagnostics can also be provided, to inform
users of errors in the R code written in exercise editors. Diagnostics
can be controlled (either globally or on a per-chunk basis) using the
exercise.diagnostics option.
Editor Size
By default, the size of the exercise editor provided to users will match the number of lines in your code chunk (with a minimum of 2 lines). If the user adds additional lines in the course of editing the editor will grow vertically up to 15 lines, after which it will display a scrollbar.
You can also specify a number of lines explicitly using the
exercise.lines chunk option (this can be done on a
per-chunk or global basis). For example, the following chunk specifies
that the exercise code editor should be 15 lines high:
```{r add-function, exercise=TRUE, exercise.lines=15}
# Write a function to add two numbers together
add_numbers
Time Limits
To mediate the problem of code which takes longer than expected to
run you can specify the exercise.timelimit chunk option or
alternatively the global tutorial.exercise.timelimit
option.
The following demonstrates setting a 10 second time limit as a global option, document level option, and chunk level option:
options(tutorial.exercise.timelimit = 10)

```{r setup, include=FALSE}
tutorial_options(exercise.timelimit = 10)
```

```{r exercise1, exercise=TRUE, exercise.timelimit=10}
```
Since tutorials are a highly interactive format you should in general
be designing exercises that take no longer than 5 or 10 seconds to
execute. Correspondingly, the default value for
tutorial.exercise.timelimit if not otherwise specified is
30 seconds.