The shinyloadtest package and the accompanying shinycannon command line tool make it possible to load test deployed Shiny apps. Load testing helps developers and administrators estimate how many users their application can support. If an application requires tuning, load testing and load test result analysis can be used to identify performance bottlenecks and to guide changes to infrastructure, configuration, or code.
Scientific load testing helps put to rest the common misconception that “Shiny doesn’t scale”. As rstudio::conf(2018) Sean Lopp presented on Scaling Shiny which shows how to to horizontally scale an app to handle tens of thousands of users.
Installation
To perform a load test you’ll need two pieces of software:
-
shinyloadtestis an R package used to generate recordings and analyze results. You should install it on your development machine withinstall.packages("shinyloadtest"). -
shinycannonis a command-line used to replay recordings in parallel. You can install it on your development machine for testing, but for best results we recommend installing it on a server, and preferably not the one the application under test is also on. See installation instructions for operating specific install instructions..
Quick Start
The process for load testing a Shiny application consists of three steps:
- Record a typical user session for the app.
- Replay the session in parallel, simulating many simultaneous users accessing the app.
- Analyze the results of the load test and determine if the app performed well enough.
Rinse and repeat as necessary. Each step is described below.
Step 1: Recording
Record a session using shinyloadtest::record_session(), which takes the URL of the deployed application as an argument:
shinyloadtest::record_session("https://shinyapp.example.com/")Running the function will open a browser displaying the app. Once open, interact with the application as a typical user might then close the browser. After closing the app, a file (recording.log by default) will be created that contains a recording of the session. This recording will serve as the basis for the load test.
If your application requires authentication, consult the authentication article. Also be aware that certain Shiny features are not compatible with shinyloadtest.
Step 2: Run the Load Test
With the recording in hand, we’re ready to run the load test. The actual test is conducted outside of R using the shinycannon command-line tool. You can run it using your system’s terminal or console program, or you can run it from the RStudio IDE’s terminal tab. A typical run looks like this:
shinycannon recording.log https://shinyapp.example.com/ --workers 5 --loaded-duration-minutes 2 --output-dir run1(On Windows, you will need to replace “shinycannon” with java -jar shinycannon-VERSION.jar.)
See the shinycannon article for details.
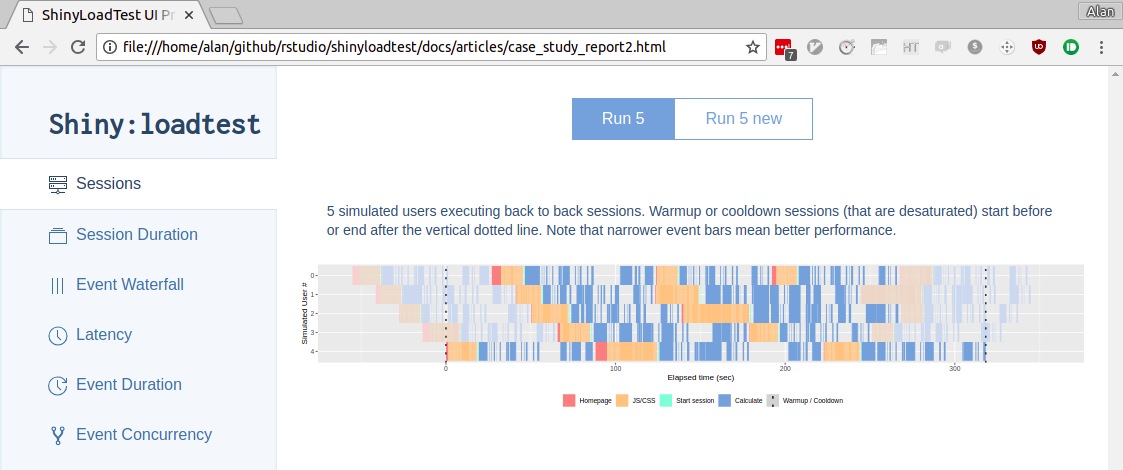
Step 3: Analyze the Results
Now we can analyse our results by reading the data into shinyloadtest::load_runs() and create a report with shinyloadtest_report():
df <- shinyloadtest::load_runs("run1")
shinyloadtest::shinyloadtest_report(df, "run1.html")
This self contained html report will be opened in your browser for inspection. For further analysis explanation, please visit Analysing load test logs.