Introduction to the Data Quality Reporting Workflow (VALID-I)
Source:vignettes/VALID-I.Rmd
VALID-I.Rmd
When trying to assess the state of data quality for tabular data, we
want to perform a full accounting of assertions on the data without
stopping anywhere in the interrogation of the data. We use an object
called an agent to collect our validation instructions, perform
the interrogation, and then serve as an artifact for reporting or
further analysis. We give that agent the name or a function that
retrieves the target table. The types of data tables that can be used
include data frames, tibbles, database tables (tbl_dbi),
and Spark DataFrames (tbl_spark).
The Elements of this Workflow: an agent, validation
functions, and interrogate()
The agent that we need for this workflow is created with the
create_agent() function. An agent can handle one target
table at any given time and the tbl argument is where the
target is specified. We can supply the input table directly to the
agent by giving tbl the table object.
Alternatively, we can make it such that the table is only read in at
interrogation-time. This is useful in situations where we might deploy
an agent from a YAML file. This ‘lazy reading’ of a target table can be
accomplished in two ways: (1) using a ‘table-prep formula’, which is a
one-sided R formula expression (e.g.,
~ <table reading code>), or (2) providing a function
(e.g., function() { <table reading code> }).
The agent needs directives on what to do with the table, so,
we provide validation functions. Some check for the existence or type of
column (col_exists() or the group of
col_is_*() functions). Others check each cell in a column
for satisfying a specific condition (the col_vals_*()
functions). We can use as many of these as necessary for satisfactory
validation testing of the table in question. There are certainly quite a
few of them, so here’s a list of the validation functions with a
questioning phrase for each function’s purpose:
-
col_vals_lt(): Are column data less than a specified value? -
col_vals_lte(): Are column data less than or equal to a specified value? -
col_vals_equal(): Are column data equal to a specified value? -
col_vals_not_equal(): Are column data not equal to a specified value? -
col_vals_gte(): Are column data greater than or equal to a specified value? -
col_vals_gt(): Are column data greater than a specified value? -
col_vals_between(): Are column data between two specified values? -
col_vals_not_between(): Are column data not between two specified values? -
col_vals_in_set(): Are column data part of a specified set of values? -
col_vals_not_in_set(): Are data not part of a specified set of values? -
col_vals_make_set(): Is a set of values entirely accounted for in a column of values? -
col_vals_make_subset(): Is a set of values a subset of a column of values? -
col_vals_increasing(): Are column data increasing by row? -
col_vals_decreasing(): Are column data decreasing by row? -
col_vals_null(): Are column dataNULL/NA? -
col_vals_not_null(): Are column data notNULL/NA? -
col_vals_regex(): Do strings in column data match a regex pattern? -
col_vals_within_spec(): Do values in column data fit within a specification? -
col_vals_expr(): Do column data agree with a predicate expression? -
rows_distinct(): Are row data distinct? -
rows_complete(): Are row data complete? -
col_is_character(): Do the columns contain character/string data? -
col_is_numeric(): Do the columns contain numeric values? -
col_is_integer(): Do the columns contain integer values? -
col_is_logical(): Do the columns contain logical values? -
col_is_date(): Do the columns contain RDateobjects? -
col_is_posix(): Do the columns containPOSIXctdates? -
col_is_factor(): Do the columns contain Rfactorobjects? -
col_exists(): Do one or more columns actually exist? -
col_schema_match(): Do columns in the table (and their types) match a predefined schema? -
row_count_match(): Does the row count match that of a different table? -
col_count_match(): Does the column count match that of a different table? -
tbl_match(): Does the target table match a comparison table? -
conjointly(): Do multiple rowwise validations result in joint validity? -
serially(): Run several tests and a final validation in a serial manner -
specially(): Perform a specialized validation with a user-defined function
The final function that needs to be called is the
interrogate() function. The validation functions, when
called on an agent object, don’t act on the target table until
interrogate() is used. In fact, until interrogation, the
usage of validation functions serves as instructions (building up an
interrogation plan). During the interrogation phase (i.e., when calling
interrogate()) those instructions turn into actions, with
the agent then carrying out all the validation steps of the
interrogation plan.
A Simple Example with the Basics
For our examples going forward, we’ll use the
small_table dataset. It’s included in the
pointblank package. It isn’t very large, which makes it
great for simple examples. Here it is in its entirety:
small_table## # A tibble: 13 × 8
## date_time date a b c d e f
## <dttm> <date> <int> <chr> <dbl> <dbl> <lgl> <chr>
## 1 2016-01-04 11:00:00 2016-01-04 2 1-bcd-345 3 3423. TRUE high
## 2 2016-01-04 00:32:00 2016-01-04 3 5-egh-163 8 10000. TRUE low
## 3 2016-01-05 13:32:00 2016-01-05 6 8-kdg-938 3 2343. TRUE high
## 4 2016-01-06 17:23:00 2016-01-06 2 5-jdo-903 NA 3892. FALSE mid
## 5 2016-01-09 12:36:00 2016-01-09 8 3-ldm-038 7 284. TRUE low
## 6 2016-01-11 06:15:00 2016-01-11 4 2-dhe-923 4 3291. TRUE mid
## 7 2016-01-15 18:46:00 2016-01-15 7 1-knw-093 3 843. TRUE high
## 8 2016-01-17 11:27:00 2016-01-17 4 5-boe-639 2 1036. FALSE low
## 9 2016-01-20 04:30:00 2016-01-20 3 5-bce-642 9 838. FALSE high
## 10 2016-01-20 04:30:00 2016-01-20 3 5-bce-642 9 838. FALSE high
## 11 2016-01-26 20:07:00 2016-01-26 4 2-dmx-010 7 834. TRUE low
## 12 2016-01-28 02:51:00 2016-01-28 2 7-dmx-010 8 108. FALSE low
## 13 2016-01-30 11:23:00 2016-01-30 1 3-dka-303 NA 2230. TRUE highWhat follows is a very simple validation plan. We will test that:
- the
date_timecolumn is indeed a date-time column - column
fonly has the values"low","mid", and"high" - the values in column
aare all less than10 - The strings in column
bfit a particular regex pattern ("^[0-9]-[a-z]{3}-[0-9]{3}$") - column
dhas values in the range of0to5000(this is not entirely true!)
This is how the validation plan is written and interrogated. When carried out interactively, you’ll get status messages that describe how the interrogation is going.
agent <-
  create_agent(
    tbl = small_table,
    tbl_name = "small_table",
    label = "VALID-I Example No. 1"
  ) %>%
  col_is_posix(date_time) %>%
  col_vals_in_set(f, set = c("low", "mid", "high")) %>%
  col_vals_lt(a, value = 10) %>%
  col_vals_regex(b, regex = "^[0-9]-[a-z]{3}-[0-9]{3}$") %>%
  col_vals_between(d, left = 0, right = 5000) %>%
  interrogate()
── Interrogation Started - there are 5 steps ──────────────────────────────────
✓ Step 1: OK.
✓ Step 2: OK.
✓ Step 3: OK.
✓ Step 4: OK.
✓ Step 5: OK.
── Interrogation Completed ─────────────────────────────────────────────────The five OK messages means that all of the individual
validations in each of those five validation steps passed within the
failure threshold levels. Since failure thresholds actually weren’t set,
these steps will always display OK unless an evaluation
error occurred (e.g., attempting to interrogate a column that isn’t
present in the target table). Printing the agent object
gives a step-by-step breakdown of the interrogation process.
agent
Let’s have a look at how to interpret this report. The bright green color strips at the left of each validation step indicates that all test units passed validation. The lighter green color in the final step means that there was at least one failing unit.
The STEP column provides the name of the validation
function used as a basis for a validation step. COLUMNS
shows us the target column for each validation step. The
VALUES column lists any values required for a validation
step. What is TBL? That indicates whether the table was
mutated just before interrogation in that validation step (via the
preconditions argument, available in every validation
function). The right-facing arrows indicate that the table didn’t
undergo any transformation, so we are working with the identity table in
every step. EVAL lets us know whether there would be issues
in evaluating the table itself (catching R errors and
warnings); the checkmarks down this column show us that there were no
issues during interrogation.
The total number of test units is provided next in the
... column, then the absolute number and fraction of
passing test units (PASS) and failing test units
(FAIL). The W, S, N
indicators tell us whether we have entered either of the
WARN, STOP, or NOTIFY states for
each these validation steps. Because we didn’t set any threshold levels
for these states (that can be done with the actions
argument, more on that later), they are irrelevant for this report.
Finally, the EXT column provides an opportunity to download
any data extract rows as a CSV. These rows represent the rows with
failed test units. For step 5, the
col_vals_between() validation step, there is a data extract
available (with 1 row). We can either download the CSV from
the report or examine that extract in R with the
get_data_extracts() function:
get_data_extracts(agent, i = 5)## # A tibble: 1 × 8
## date_time date a b c d e f
## <dttm> <date> <int> <chr> <dbl> <dbl> <lgl> <chr>
## 1 2016-01-04 00:32:00 2016-01-04 3 5-egh-163 8 10000. TRUE lowRecall that validation step 5 asserted that all values in
column d should be between 0 and
5000, however, this extract of small_table
shows that column d has a value of 10000 which
lies outside the specified range.
Using Threshold Levels and Actions
It can be useful to gauge data quality by setting failure thresholds for validation steps. For example, it may be acceptable at some point in time to tolerate up to 5% of failing test units for a given validation. Or, having several levels of data quality might be useful and instructive, where failing test units across validations are grouped into the 0-5%, 5-10%, and 10%- bands.
We can specify failure threshold levels with the
action_levels() function. Using the function generates an
action_levels object that can be passed to the
actions argument of create_agent() (thereby
creating a default for every validation step). In the following, we use
relative values (as real numbers between 0 and
1) to define thresholds for the WARN and
STOP conditions.
al <- action_levels(warn_at = 0.1, stop_at = 0.2)Printing the al object gives us a summary of the
settings.
al## -- The `action_levels` settings
## WARN failure threshold of 0.1 of all test units.
## STOP failure threshold of 0.2 of all test units.
## ----Let’s use the action_levels object in a new validation.
It’s similar to the last one but the parameters for some of the
validation functions will result in more failing test units. We’ll see
that the interrogation messages show mention of STOP and
WARNING conditions being met.
agent <-
  create_agent(
    tbl = small_table,
    tbl_name = "small_table",
    label = "VALID-I Example No. 2",
    actions = al
  ) %>%
  col_is_posix(date_time) %>%
  col_vals_in_set(f, set = c("low", "mid")) %>%
  col_vals_lt(a, value = 7) %>%
  col_vals_regex(b, regex = "^[0-9]-[a-w]{3}-[2-9]{3}$") %>%
  col_vals_between(d, left = 0, right = 4000) %>%
  interrogate()
── Interrogation Started - there are 5 steps ──────────────────────────────────
✓ Step 1: OK.
x Step 2: STOP condition met.
! Step 3: WARNING condition met.
x Step 4: STOP condition met.
! Step 5: WARNING condition met.
── Interrogation Completed ─────────────────────────────────────────────────Printing the agent will provide a very different agent report than seen previously, one that’s rife with yellow and red color strips to the left and matching colors in the far right columns.
agent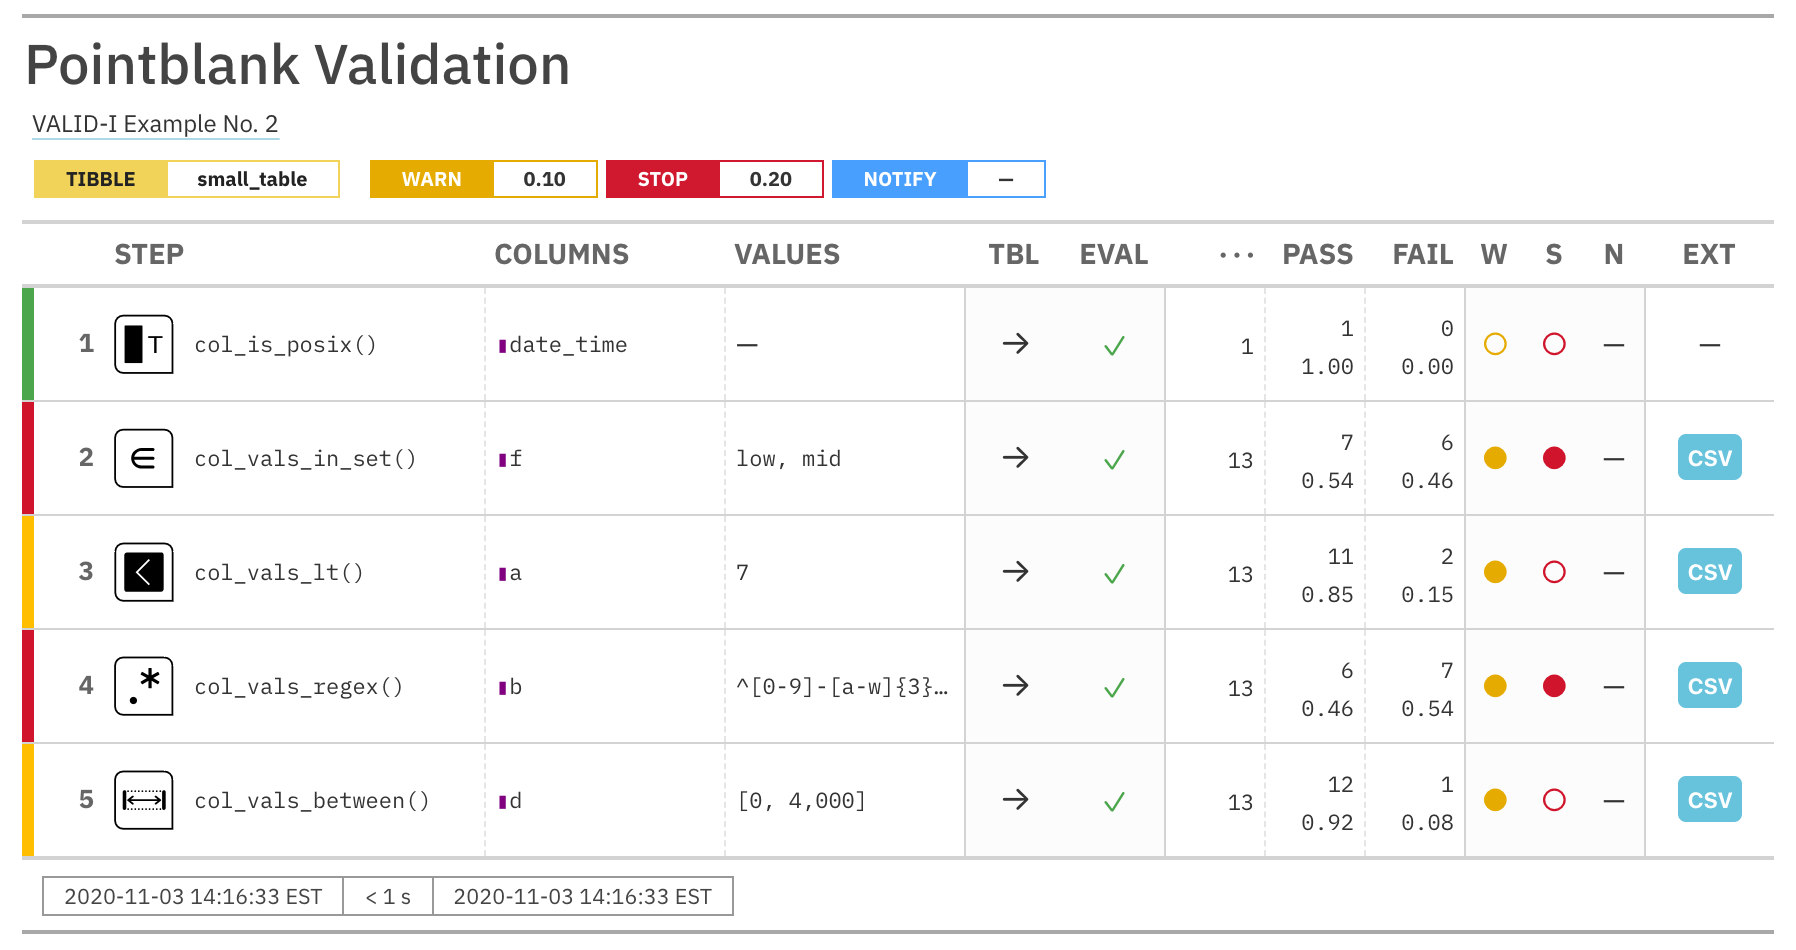
It’s possible to invoke a function when a particular failure
condition is met and this can be set in the action_levels()
function and made part of the action_levels object. One
example of a function that can be used is the included
log4r_step() function for logging failure conditions across
validation steps. Let’s make a new action_levels object and
include the logging function in the WARN and
STOP failure conditions. Note that the function calls must
be written as one-sided R formulas.
al <-
action_levels(
warn_at = 0.1,
stop_at = 0.2,
fns = list(
warn = ~ log4r_step(x),
stop = ~ log4r_step(x)
)
)Printing this new al object will show us the failure
threshold settings and the associated actions for the failure
conditions.
al## -- The `action_levels` settings
## WARN failure threshold of 0.1 of all test units.
## \fns\ ~ log4r_step(x)
## STOP failure threshold of 0.2 of all test units.
## \fns\ ~ log4r_step(x)
## ----Using this new al object with our validation workflow
will result in failures at certain validation steps to be logged. By
default, this is to a file named "pb_log_file" in the
working directory but the log4r_step() function is flexible
for allowing any log4r appender to be used.
Running the following data validation code
agent <-
create_agent(
tbl = small_table,
tbl_name = "small_table",
label = "VALID-I Example No. 3",
actions = al
) %>%
col_is_posix(date_time) %>%
col_vals_in_set(f, set = c("low", "mid")) %>%
col_vals_lt(a, value = 7) %>%
col_vals_regex(b, regex = "^[0-9]-[a-w]{3}-[2-9]{3}$") %>%
col_vals_between(d, left = 0, right = 4000) %>%
interrogate()will show us the same messages as before in the R console
── Interrogation Started - there are 5 steps ──────────────────────────────────
✓ Step 1: OK.
x Step 2: STOP condition met.
! Step 3: WARNING condition met.
x Step 4: STOP condition met.
! Step 5: WARNING condition met.

── Interrogation Completed ─────────────────────────────────────────────────and the file "pb_log_file" can be looked at with
readLines(), showing us four entries (one for each
validation step with at least a WARN condition).
readLines("pb_log_file")[1] "ERROR [2020-11-06 01:26:07] Step 2 exceeded the STOP failure threshold (f_failed = 0.46154) ['col_vals_in_set']"
[2] "WARN [2020-11-06 01:26:07] Step 3 exceeded the WARN failure threshold (f_failed = 0.15385) ['col_vals_lt']"
[3] "ERROR [2020-11-06 01:26:07] Step 4 exceeded the STOP failure threshold (f_failed = 0.53846) ['col_vals_regex']"
[4] "WARN [2020-11-06 01:26:07] Step 5 exceeded the WARN failure threshold (f_failed = 0.07692) ['col_vals_between']"The log4r_step() function is a bit special in that it
only provides the most severe condition in a given validation step, so
long as the function call is present in multiple conditions of the
list() given to action_levels()’s
fns argument.
It’s possible to provide any custom-made function that generates some
side effect in the same way as log4r_step() is used. Just
like log4r_step(), the custom function can take advantage
of the x variable, which is the x-list for the validation
step. Let’s take a look at what that is for step 2 (the
col_vals_in_set validation step) by using the
get_agent_x_list() function:
x <- get_agent_x_list(agent, i = 2)
x
── The x-list for STEP 2 ────────────────────────────────────────────
$time_start $time_end (POSIXct [1])
$label $tbl_name $tbl_src $tbl_src_details (chr [1])
$tbl (spec_tbl_df, tbl_df, tbl, and data.frame)
$col_names $col_types (chr [8])
$i $type $columns $values $label $briefs (mixed [1])
$eval_error $eval_warning (lgl [1])
$capture_stack (list [1])
$n $n_passed $n_failed $f_passed $f_failed (num [1])
$warn $stop $notify (lgl [1])
$lang (chr [1])
─────────────────────────────────────────────────────────────────The message in the console shows us what’s available in
x, with some indication of the output types. If we wanted
to know the number of test units, the fraction of those that failed, and
whether the STOP condition was entered, we can access those
and even put them into a character string (along with other info from
the x-list).
glue::glue(
  "In Step {x$i}, there were {x$n} test units and {x$f_failed * 100}% \\
  failed. STOP condition met: {tolower(x$stop)}."
)
In Step 2, there were 13 test units and 46.154% failed. STOP condition met: true.This is a great way to test a function for use as a validation step
‘action’ because when invoked it will undergo evaluation in an
environment that contains x (which will have the same
structure).